Zerto Virtual Manager Outage, Replication, and Self-Healing

I’ve decided to explore what happens when a ZVM (Zerto Virtual Manager) in either the protected site or the recovery site is down for a period of time, and what happens when it is back in service, and most importantly, how an outage of either ZVM affects replication, journal history, and the ability to recover a workload.

Before getting in to it, I have to admit that I was happy to see how resilient the platform is through this test, and how the ability to self-heal is a built in “feature” that rarely gets talked about.

Questions:

  • Does ZVR still replicate when a ZVM goes down?
  • How does a ZVM being down affect checkpoint creation?
  • What can be recovered while the ZVM is down?
  • What happens when the ZVM is returned to service?
  • What happens if the ZVM is down longer than the configured Journal History setting?

Acronym Decoder & Explanations

ZVMZerto Virtual Manager
ZVRZerto Virtual Replication
VRAVirtual Replication Appliance
VPGVirtual Protection Group
RPORecovery Point Objective
RTORecovery Time Objective
BCDRBusiness Continuity/Disaster Recovery
CSPCloud Service Provider
FOTFailover Test
FOLFailover Live

Does ZVR still replicate when a ZVM goes down?

The quick answer is yes.  Once a VPG is created, the VRAs handle all replication.    The ZVM takes care of inserting and tracking checkpoints in the journal, as well as automation and orchestration of Virtual Protection Groups (VPGs), whether it be for DR, workload mobility, or cloud adoption.

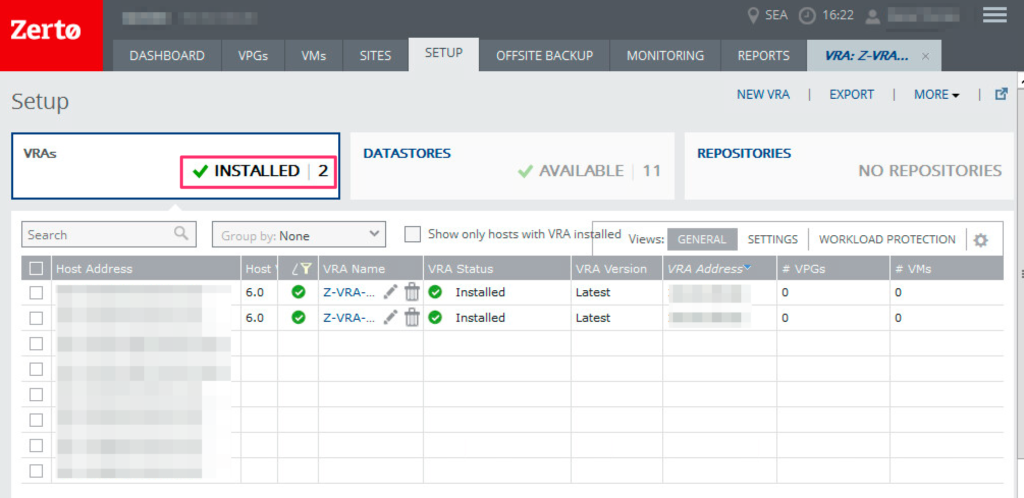
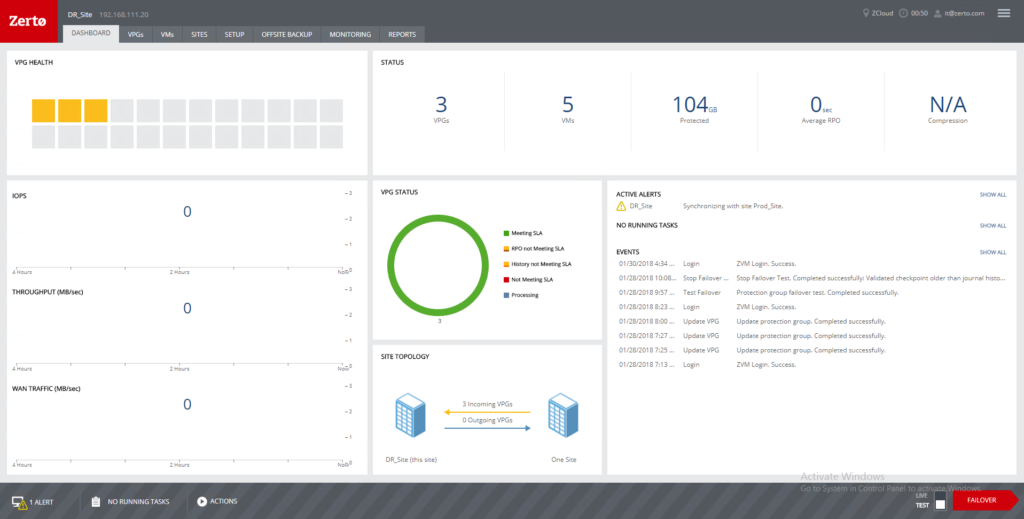
In the protected site, I took the ZVM down for over an hour via power-off to simulate a failure.  Prior to that, I made note of the last checkpoint created.  As the ZVM went down, within a few seconds, the protected site dashboard reported RPO as 0 (zero), VPG health went red, and I received an alert stating “The Zerto Virtual Manager is not connected to site Prod_Site…”

The Zerto Virtual Manager is not connected to site Prod_Site


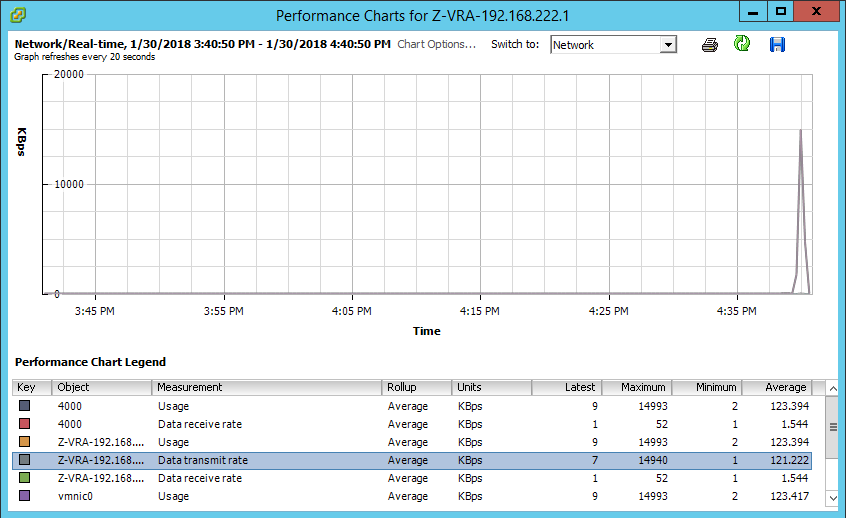
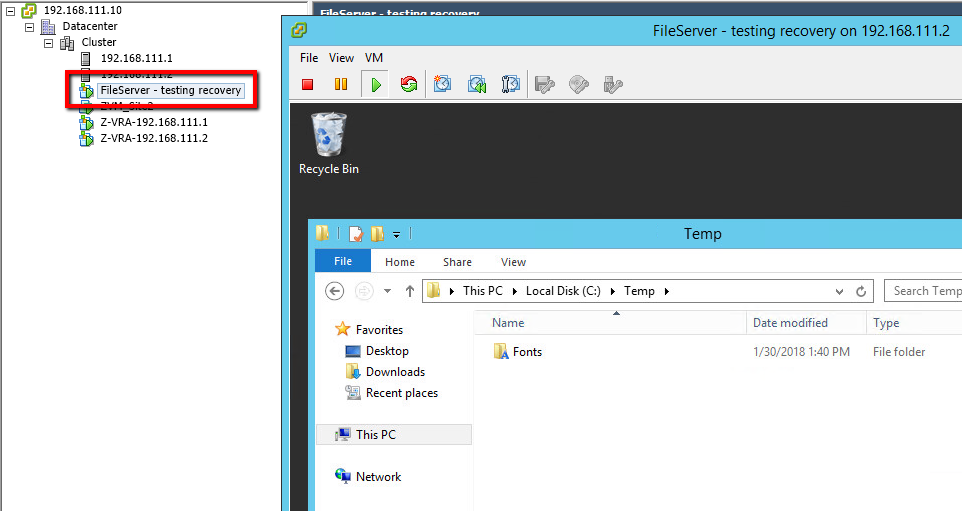
Great, so the protected site ZVM is down now and the recovery site ZVM noticed.  The next step for me was to verify that despite the ZVM being down, the VRA continued to replicate my workload.  To prove this, I opened the file server and copied the fonts folder (C:\Windows\Fonts) to C:\Temp (total size of data ~500MB).

As the copy completed, I then opened the performance tab of the sending VRA and went straight to see if the network transmit rate went up, indicating data being sent:

VRA Performance in vSphere, showing data being transmitted to remote VRA in protected site.

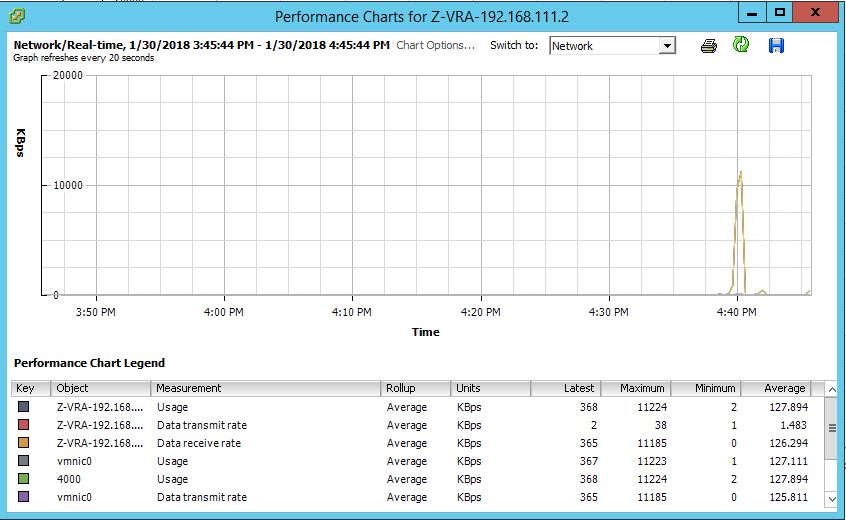
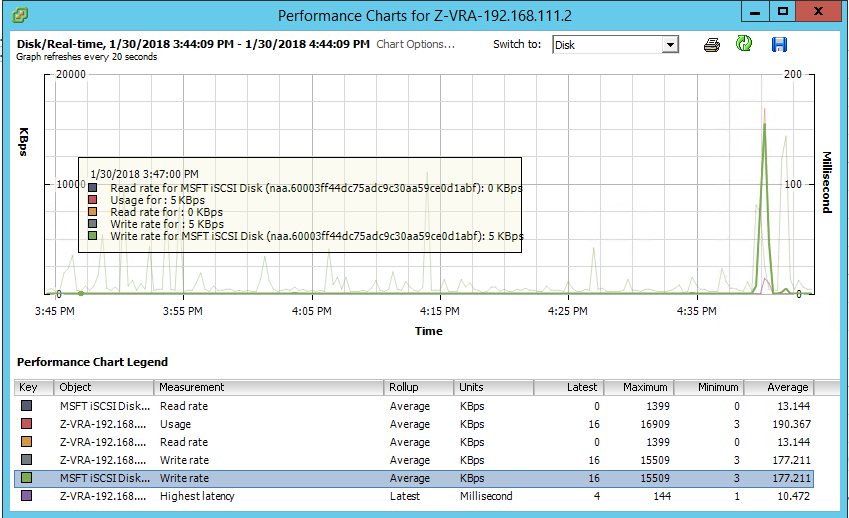
Following that, I opened the performance monitor on the receiving VRA and looked at two stats: Data receive rate, and Disk write rate, both indicating activity at the same timeframe as the sending VRA stats above:

Data receive rate (Network) on receiving/recovery VRA Disk write rate on receiving/recovery VRA

As you can see, despite the ZVM being down, replication continues, with caveats though, that you need to be aware of:

  • No new checkpoints are being created in the journal
  • Existing checkpoints up to the last one created are all still recoverable, meaning you can still recover VMs (VPGs), Sites, or files.

Even if replication is still taking place, you will only be able to recover to the latest (last recorded checkpoint) before the ZVM went down.  When the ZVM returns, checkpoints are once again created, however, you will not see checkpoints created for the entire time that ZVM was unavailable.  In my testing, the same was true for if the recovery site ZVM went down while the protected site ZVM was still up.

How does the ZVM being down affect checkpoint creation?

If I take a look at the Journal history for the target workload (file server), I can see that since the ZVM went away, no new checkpoints have been created.  So, while replication continues on, no new checkpoints are tracked due to the ZVM being down, since one of it’s jobs is to track checkpoints.

Last checkpoint created over 30 minutes ago, right before the ZVM was powered off.


What can be recovered while the ZVM is down?

Despite no new checkpoints being created – FOT or FOL – VPG Clone, Move, and File Restore services are still available for the existing journal checkpoints.  Given this was something I’ve never tested before, this was really impressive.

One thing to keep in mind though is that this will all depend on how long your Journal history is configured for, and how long that ZVM is down.  I provide more information about this specific topic further down in this article.

What happens when the ZVM is returned to service?

So now that I’ve shown what is going on when the ZVM is down, let’s see what happens when it is back in service.  To do this, I just need to power it back up, and allow the services to start, then see what is reported in the ZVM UI on either site.

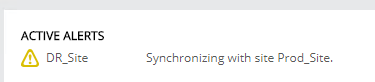
As soon as all services were back up on the protected site ZVM, the recovery site ZVM alerted that a Synchronization with site Prod_Site was initiated:

Synchronizing with site Prod_Site

Recovery site ZVM Dashboard during site synchronization.

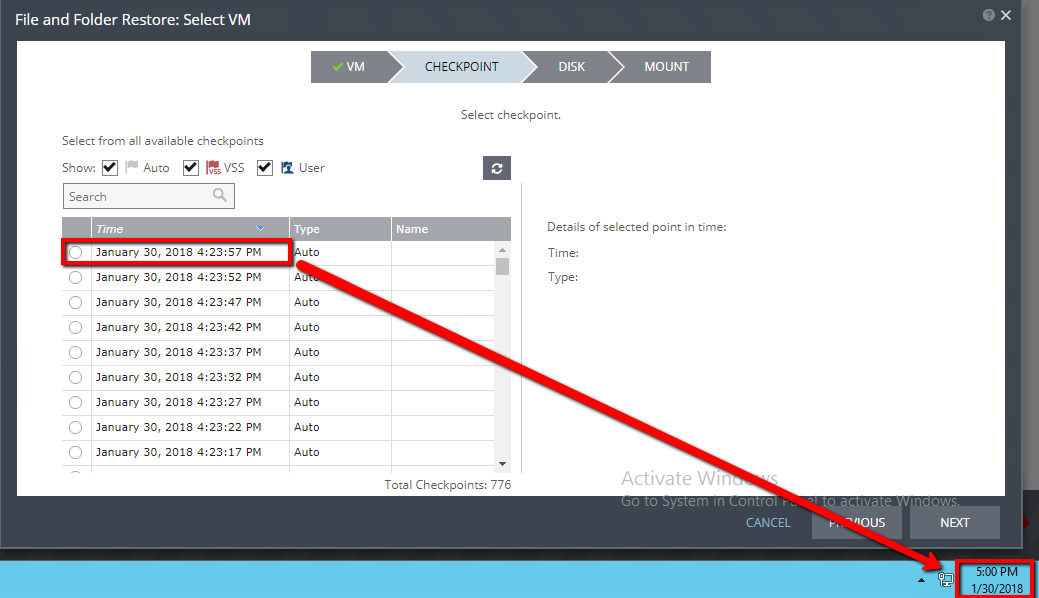
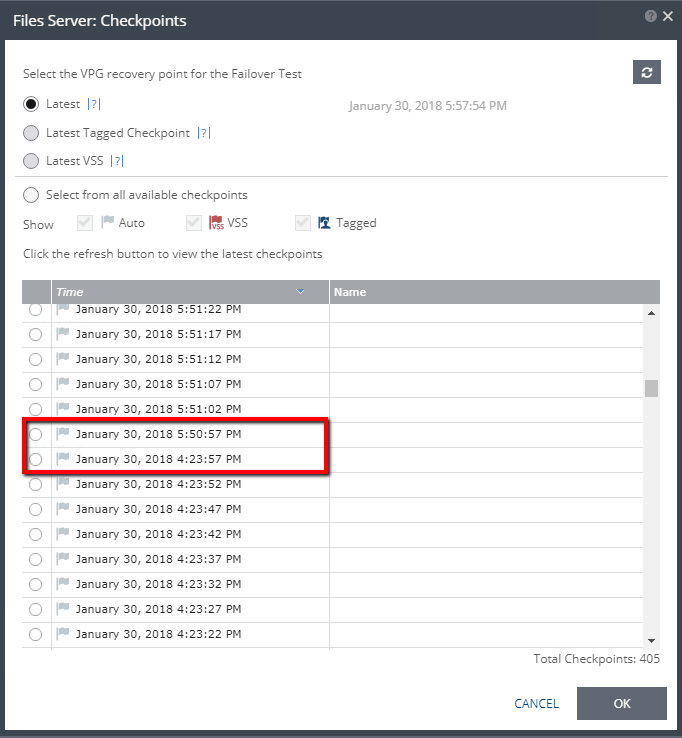
The next step here is to see what our checkpoint history looks like.  Taking a look at the image below, we can see when the ZVM went down, and that there is a noticeable gap in checkpoints, however, as soon as the ZVM was back in service, checkpoint creation resumed, with only the time during the outage being unavailable.

Checkpoints resume


What happens if the ZVM is down longer than the configured Journal History setting?

In my lab, for the above testing, I set the VPG history to 1 hour.  That said, if you take a look at the last screen shot, older checkpoints are still available (showing 405 checkpoints).  When I first tried to run a failover test after this experiment, I was presented with checkpoints that go beyond an hour.  When I selected the oldest checkpoint in the list, a failover test would not start, even if the “Next” button in the FOT wizard did not gray out.  What this has lead me to believe is that it may take a minute or two for the journal to be cleaned up.

Because I was not able to move forward with a failover test (FOT), I went back in to select another checkpoint, and this time, the older checkpoints were gone (from over an hour ago).  Selecting the oldest checkpoint at this time, allowed me to run a successful FOT because it was within range of the journal history setting.  Lesson learned here – note to self: give Zerto a minute to figure things out, you just disconnected the brain from the spine!

Updated Checkpoints within Journal History Setting

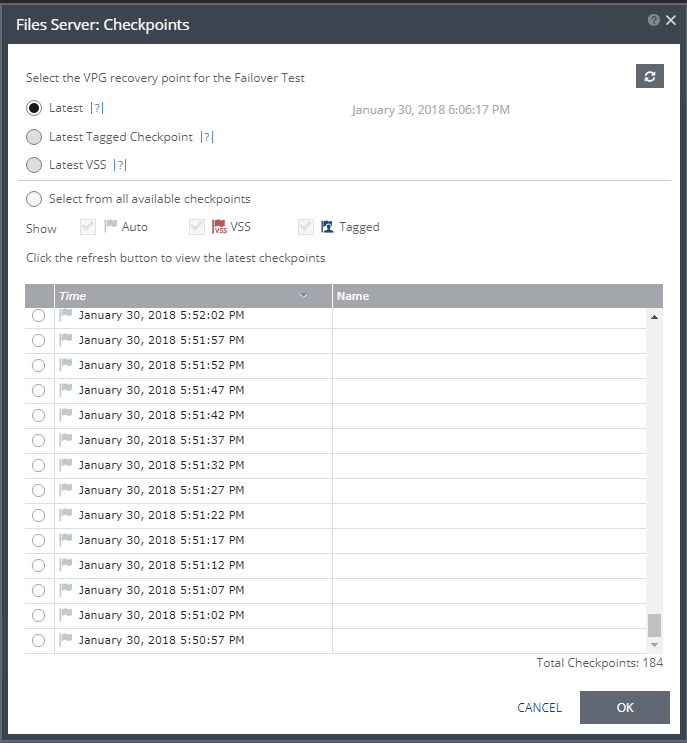
Running a failover test to validate successful usage of checkpoints after ZVM outage:

File Server FOT in progress, validating fonts folder made it over to recovery site.

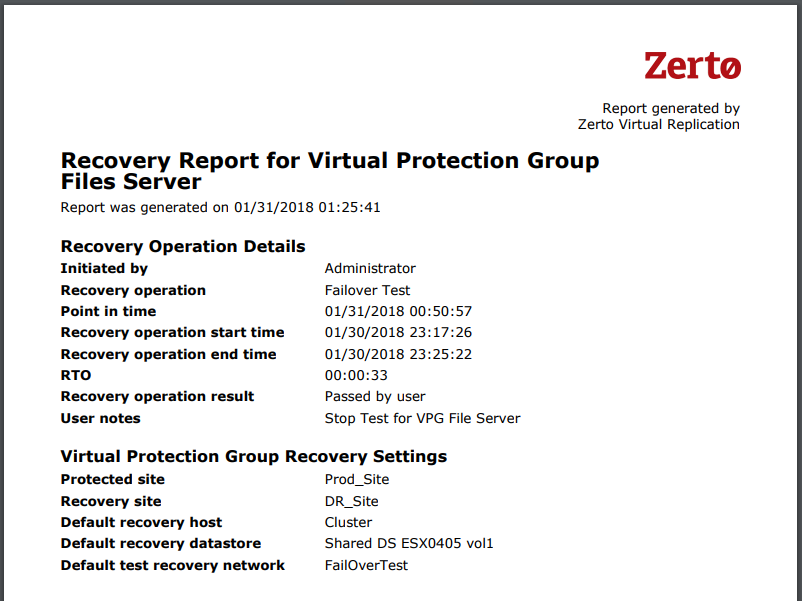
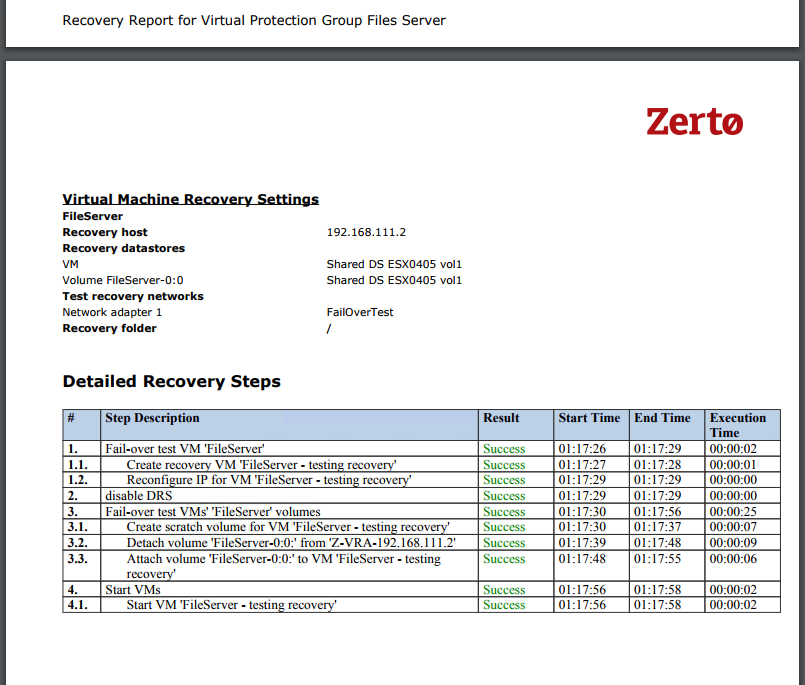
And… a recovery report to prove it:

Recovery Report - Successful FOT Recovery Report - Successful FOT


Summary and Next Steps

So in summary, Zerto is self-healing and can recover from a ZVM being down for a period of time.  That said, there are some things to watch out for, which include known what your configured journal setting is, and how a ZVM being down longer than the configured history setting affects your ability to recover.

You can still recover, however, you will start losing older checkpoints as time goes on while the ZVM is down.  This is because of the first-in-first-out (FIFO) nature of how the journal works.  You will still have the replica disks and journal checkpoints committing to it as time goes on, so losing history doesn’t mean you’re lost, you will just end up breaching your SLA for history, which will re-build over time as soon as the ZVM is back up.

As a best practice, it is recommended you have a ZVM in each of your protected sites, and in each of your recovery sites for full resilience.  Because after all, if you lose one of the ZVMs, you will need at least either the protected or recovery site ZVM available to perform a recovery.  The case is different if you have a single ZVM.  If you must have a single ZVM, put it into the recovery site, and not on the protected site, because chances are, your protected site is what you’re accounting for going down in any planned or unplanned event.  It makes most sense to have the single ZVM in the recovery site.

In the next article, I’ll be exploring this very example of a single ZVM and how that going down affects your resiliency.  I’ll also be testing some ways to potentially protect that single ZVM in the event it is lost.

Thanks for reading!  Please comment and share, because I’d like to hear your thoughts, and am also interested in hearing how other solutions handle similar outages.

Share This:

Zerto: Dual NIC ZVM

Something I recently ran into with Zerto (and this can happen for anything else) was the dilemma of being able to protect remote sites that (doesn’t happen often) happen to have IP addresses that are identical in both the protected and recovery sites.  And no, this wasn’t planned for, it was just discovered during my Zerto deployment in what we’ll call the protected sites.

Luckily, our network team had provisioned two new networks that are isolated, and connected to these protected sites via MPLS.  Those two new networks do not have the ability to talk back to our existing enterprise network without firewalls getting involved, and this is by design since we are basically consolidating data centers while absorbing assets and virtual workloads from a recently acquired company.

When I originally installed the ZVM in my site (which we’ll call the recovery site), I had used IP addresses for the ZVM and VRAs that were part of our production network, and not the isolated network set aside for this consolidation.  Note: I installed the Zerto infrastructure in the recovery site ahead of time before discussions about the isolated networks was brought up.  So, because I needed to get this onto the isolated network in order to be able to replicate data from the protected sites to the recovery site, I set out to re-IP the ZVM, and re-IP the VRAs.  Before I could do that, I needed to provide justification for firewall exceptions in order for the ZVM in the recovery site to link to the vCenter, communicate with ESXi hosts for VRA deployment, and also to be able to authenticate the computer, users, service accounts in use on the ZVM.  Oh, and I also needed DNS and time services.

The network and security teams asked if they could NAT the traffic, and my answer was “no” because Zerto doesn’t support replication using NAT.  That was easy, and now the network team had to create firewall exceptions for the ports I needed.

Well,  as expected, they delivered what I needed.  To make a long story short, it all worked, and then about 12 hours before we were scheduled to perform our first VPG move, it all stopped working, and no one knew why.  At this point, it was getting really close to us pulling the plug on the migration the following day, but I was determined to get this going and prevent another delay in the project.

When looking for answers, I contacted my Zerto SE, reached out on twitter, and also contacted Zerto Support.  Well, at the time I was on the phone with support, we couldn’t do anything because communication to the resources I needed was not working.  We couldn’t perform a Zerto re-configure to re-connect to the vCenter, and at this point, I had about 24VPGs that were reporting they were in sync (lucky!), but ZVM to ZVM communication wasn’t working, and recovery site ZVM was not able to communicate with vCenter, so I wouldn’t have been able to perform the cutover.  So since support couldn’t help me out in that instance, I scoured the Zerto KB looking for an alternate way of configuring this where I could get the best of both worlds, and still be able to stay isolated as needed.

I eventually found this KB article that explained that not only is it supported, but it’s also considered a best practice in CSP or large environments to dual-NIC the ZVM to separate management from replication traffic.  I figured, I’m all out of ideas, and the back-and-forth with firewall admins wasn’t getting us anywhere; I might as well give this a go.  While the KB article offers the solution, it doesn’t tell you exactly how to do it, outside of adding a second vNIC to the ZVM.  There were some steps missing, which I figured out within a few minutes of completing the configuration.  Oh, and part of this required me to re-IP the original NIC back to the original IP I used, which was on our production network.  Doing this re-opened the lines of communication to vCenter, ESXi hosts, AD, DNS, SMTP, etc, etc… Now I had to focus on the vNIC that was to be used for all ZVM to ZVM as well as replication traffic.  In a few short minutes, I was able to get communication going the way I needed it, so the final thing I needed to do was re-configure Zerto to use the new vNIC for it’s replication-related activities.  I did that, and while I was able to re-establish the production network communications I needed, now I wasn’t able to access the remote sites (ZVM to ZVM) or access the recovery site VRAs.

It turns out, what I needed here were some static, persistent routes to the remote networks, configured to use the specific interface I created for it.

Here’s how:

The steps I took are below the image.  If the image is too small, consider downloading the PDF here.

zerto_dual_nic_diagram


On the ZVM:

  1. Power it down, add 2nd vNIC and set it’s network to the isolated network.  Set the primary vNIC to the production network.
  2. Power it on.  When it’s booted up, log in to Windows, and re-configure the IP address for the primary vNIC.  Reboot to make sure everything comes up successfully now that it is on the correct production network.
  3. After the reboot, edit the IP configuration of the second vNIC (the one on the isolated network).  DO NOT configure a default gateway for it.
  4. Open the Zerto Diagnostics Utility on the ZVM. You’ll find this by opening the start menu and looking for the Zerto Diagnostics Utility.  If you’re on Windows Server 2008 or 2012, you can search for it by clicking the start menu and starting to type “Zerto.”
    zerto_dual_nic_1_4
  5. Once the Zerto Diagnostics Utility loads, select “Reconfigure Zerto Virtual Manager” and click Next.
    zerto_dual_nic_1_5
  6. On the vCenter Server Connectivity screen, make any necessary changes you need to and click Next.  (Note: We’re only after changing the IP address the ZVM uses for replication and ZVM-to-ZVM communication, so in most cases, you can just click Next on this screen.)
  7. On the vCloud Director (vCD) Connectivity screen, make any necessary changes you need to and click Next. (Note: same note in step 6)
  8. On the Zerto Virtual Manager Site Details screen, make any necessary changes you need to  and click Next. (Note: same as note in step 6)
  9. On the Zerto Virtual Manager Communication screen, the only thing to change here is the “IP/Host Name Used by the Zerto User Interface.”  Change this to the IP Address of your vNIC on the isolated Network, then click Next.zerto_dual_nic_1_9
  10. Continue to accept any defaults on following screens, and after validation completes, click Finish, and your changes will be saved.
  11. Once the above step has completed, you will now need to add a persistent, static route to the Windows routing table.  This will tell the ZVM that for any traffic destined for the protected site(s), it will need to send that traffic over the vNIC that is configured for the isolated network.
  12. Use the following route statement from the Windows CLI to create those static routes:
    route ADD [Destination IP] MASK [SubnetMask] [LocalGatewayIP] IF [InterfaceNumberforIsolatedNetworkNIC] -p
    Example:>
    route ADD 192.168.100.0 MASK 255.255.255.0 10.10.10.1 IF 2 -p
    route ADD 102.168.200.0 MASK 255.255.255.0 10.10.10.1 IF 2 -p
    
    Note: To find out what the interface number is for your isolated network vNIC, run route print from the Windows CLI.  It will be listed at the top of what is returned.


zerto_dual_nic_1_10

Once you’ve configured your route(s), you can test by sending pings to remote site IP addresses that you would normally not be able to see.

After performing all of these steps, my ZVMs are now communicating without issue and replications are all taking place.  A huge difference from hours before when everything looked like it was broken.  The next day, we were able to successfully move our VPGs from protected sites to recovery sites without issue, and reverse protect (which we’re doing for now as a failback option until we can guarantee everything is working as expected).

If this is helpful or you have any questions/suggestions, please comment, and please share! Thanks for reading!


Share This:

Zerto: Deploy Virtual Replication Appliances

If you’ve followed along with Zerto: ZVM Installation, this entry is a continuation, and provides steps to deploying the Zerto Virtual Replication Appliances.

After installation has succeeded, open a browser, and connect to https://ZVMFQDN:9669/zvm.

Notes:

  • If this VM lives in a protected network for management/utility servers, you might need to allow port 9669 from your local network to the network the ZVM lives in.  The Zerto Standalone UI, vCenter Web Client, and vCenter C# client all use port 9669 to access the ZVM.
  • Be sure to use a supported browser.  Chrome, Firefox, and IE 11+ are recommended by Zerto.
  1. Log on using your vCenter credentials.zerto_vra_deploy_1_1
  2. Enter a license key and click Start.

After entering the license key and clicking start, you’re taken to the dashboard, however, before starting to protect VMs, the VRAs will need to be installed on the hosts in the site and pair the protected and recovery sites.

Install the VRAs

The Zerto installation includes the OVF template for VRAs.  A VRA must be installed on every host that manages protected VMs in the protected site, and on every host that will manage VMs in the recovery site.

The VRA compresses data that is passed across the WAN from the protected to recovery site, and automatically adjusts the compression level according to the CPU usage, totally disabling it if required.

A VRA can manage a maximum of 1500 volumes, whether they are protected or not.

VRA Requirements

Each VRA must have:

  • 12.5GB datastore space
  • at least 1GB of reserved memory
  • Each host installed to must be at least ESX/ESXi 4.0 U1 and have ports 22 and 443 enabled for the duration of the installation.

If you are installing to ESXi 5.5 or higher, the VRA should connect to the host with user credentials, otherwise, the password for the host root account is required.  Because of the method used when the VRA connects to the host using a VIB (ESXi 5.5 or higher), it is not necessary to enter the root password.

During VRA deployment, you should have IP addresses reserved, as it is not recommended to use DHCP; so be sure to also have the information for the subnet mask, and default gateway.

If you do not have SSH enabled on your hosts, the ZVM will attempt to enable and disable it during the installation of the VRA.

Important: Do not snapshot a VRA, as it will cause problems with replication!  I actually
forgot to exclude the VRAs from backups, and CommVault attempted to back them up after I had
configured my first VPG, and I ended up having to re-deploy the VRAs.  My advice is to create a
folder for the VRAs in your vCenter folder structure and have that folder excluded from backups
altogether.  Don't forget to move the VRAs into the folder as soon as they're deployed.

Installation

  1. Log in to the Zerto Manager UI
  2. Click on the Setup tab.zerto_vra_deploy_2_2
  3. Locate the host you want to deploy the VRA to, and check the box beside it.  Once you have selected the host, click New VRA.
    Note:  If you select multiple hosts, clicking the New VRA link
    will only install on the first host that you have selected.

    zerto_vra_deploy_2_3

  4. Specify the host, datastore, network, RAM, group, and enter the network details, then click Install.  Repeat the steps for each additional VRA you need to deploy (one per host).
    Note: When you deploy a VRA, Zerto will automatically reserve the amount of
    memory equal to what you specify in the VRA RAM settings.  This amount of RAM is the maximum buffer
    size for the VRA that is used to buffer IOs written by the protected virtual machines before the
    writes are sent over the network to the recovery VRA.  The recovery VRA also buffers incoming IOs
    until they are written to the journal.  If a buffer becomes full, a Bitmap Sync is performed after
    space is freed up in the buffer.
    The protecting VRA can use up to 90% of its buffer for IOs to send to the recovery VRA, which can
    use up to 75% of its buffer before it is full and requires a bitmap sync.

    zerto_vra_deploy_2_4

  5. After all VRA installations are completed, the setup tab will contain more information for each host that has a VRA installed.zerto_vra_deploy_2_5

Once you’ve completed these steps for each host requiring a VRA, you can create Virtual Protection Groups and start protecting your workloads.

Share This:

Zerto Virtual Replication 4.5

In addition to VMware Site Recovery Manager evaluation, I’ve also been asked to perform a side-by-side comparison with Zerto Virtual Replication, and provide an outcome report to help leadership make an informed decision on which product will best meet our BCDR requirements.

In addition to our current use case for BCDR, we’ve recently acquired another business, who already has Zerto licenses; so, I’ll also be evaluating Zerto’s capability to migrate virtual workloads between sites.

IMHO for something like a migration project where we’re not shutting down a data center, Zerto would work great due to the fact that it is simple, and the software is very agnostic in terms of versioning. Even moreso,  it can protect and recover in two completely different virtualization environments, namely VMware vSphere versus Microsoft Hyper-V (cloud too).

I’m already expecting the laundry list of “tasks” with Zerto to be extremely short, and since I’ve worked with Zerto in my previous role as a PS Engineer for a local consulting firm, I know it works and it will blow their minds.

mindblown


Share This: