This one took a while to get out there, but alas, it has been published for public consumption.
With that, I’m happy to be able to share this new whitepaper with the community, as it was not only great to hear that Zerto supports it, but it was also a blast testing and documenting the solution!
As a part of the Zerto 8.0 launch earlier this year (March 22, 2020 to be exact), the AWS Storage Gateway was officially announced as being supported as a Zerto LTR (Long Term Retention/Backup) target, which effectively enables you to send your Zerto backups to Amazon S3.
Sure, as of Zerto 8.5, you can actually configure Azure Blob (Hot/Cold) Storage or Amazon S3 (with Infrequent Access Tier support) for Zerto backups, which will effectively enable you to send backups directly to the public clouds via HTTPs.
That said, where does the AWS Storage Gateway fit into the picture? When or why should I use it as opposed to sending my backups directly to the cloud?
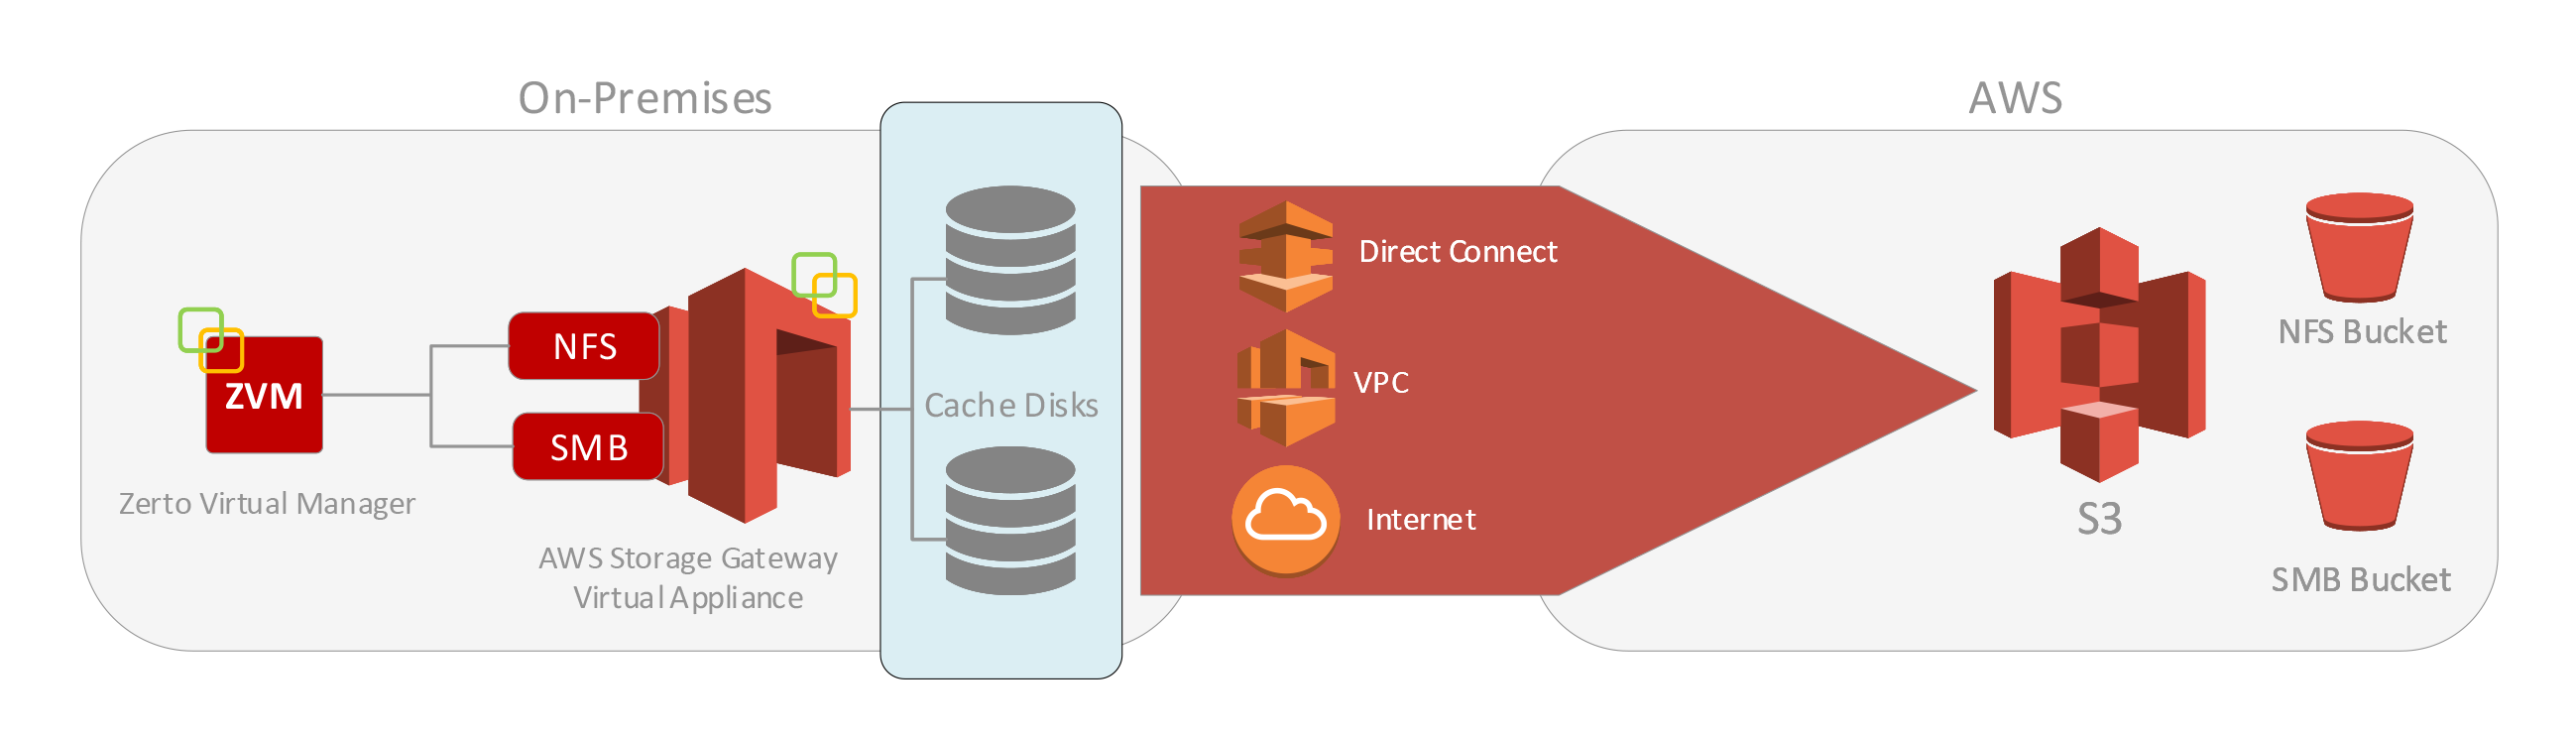
In a nutshell, the difference between what Zerto does in 8.5, and what you get by using the AWS Storage Gateway is that with the storage gateway, you are getting a cached copy of your backup data on-premises, which resides outside of Zerto’s short term journal. Here’s how that topology looks:
What we see here is that the Storage Gateway sits on-premises, and serves as a cache location for most frequently accessed data. You connect it to Zerto as an NFS or SMB repository (SMB must be used for indexing, btw) and configure your Virtual Protection Groups to send backups to this repository.
What you will get is a Zerto backup that will complete locally, and then the Storage Gateway asynchronously replicates that data out to an S3 bucket of your choosing. If you need to restore something from the backups (if your short term journal doesn’t contain what you need), you can quickly restore that data from the storage gateway without having to pull the data back down from S3.
Now that I’ve set the stage – without further ado (yeah I googled this to be sure I used the correct term), here’s the link to the whitepaper: https://bit.ly/2Krs14y
As an added bonus, if you are strapped for time and don’t want to read, I’ve also created a video that walks through the same steps to install and configure the AWS Storage Gateway for use with Zerto:
If you have found this useful, please be social and share! As usual, thanks for reading, and watching. Please leave any comments and questions below!
Note: This post is written specifically for VMware Tools 10. If you’re looking for a procedure that works with VMware Tools 11 or VMware Tools 12, you can see my latest blog post here.
One of things I rarely get to do is work with Hyper-V, however, I’m starting to get more exposure to it as I encounter more organizations that are either running all Hyper-V or are doing some type of migration between Hyper-V and vSphere.
One of the biggest challenges that I’ve both heard and encountered in my own testing is really around drivers. If you’re making the move from Hyper-V to vSphere, you’re going to have to figure out how to get your network settings migrated along with the virtual machines, whether manually or in a more automated way.
And yes! You can definitely use Zerto as the migration vehicle and take advantage of benefits like:
Non-disruptive replication
Automatic conversion of .vhdx to .vmdk (and vice versa)
Non-disruptive testing before migrating
Boot Order
Re-IP
For re-IP operations , Zerto requires that VMware Tools is installed running on the VMs you want to protect.
There are two ways to accomplish a cross-hypervisor migration or failover with Zerto.
Installing the VMware Tools is going to be required either way. If you choose to install the VMware Tools before migrating or protecting, you are going to get much better results.
Post-installation of the VMware Tools will prevent the capability to automatically re-IP or even keep the existing network settings, therefore, you will end up having to hand-IP every VM you migrate/failover, which seriously cuts into any established recovery time objective (RTO) and leaves more room for human error.
Overview
We will walk through what you need to do in order to get VMware Tools prepared for installation on a Hyper-V virtual machine. After that, there is a video at the end of this post that will pick demonstrate successful pre-installation of VMware Tools, replication, and migration of a VM from Hyper-V.
At the time of this writing, the versions of Zerto, Hyper-V, and vSphere that I have performed the steps that follow are:
Zerto 8.0
Hyper-V 2016
vSphere 6.7 (VMware Tools from 6.7 as well)
I also wanted to give a shout out to Justin Paul, who had written a similar blog post about this same subject back in 2018. You can find his original post here: https://bit.ly/3dfWKdm
Pre-Requisites
Like a recipe, you’re going to need a few things:
VMware Tools
You will need to obtain a copy of the VMware Tools, and it must be a version supported by your version of vSphere. You can use this handy >>VMware version mapping file<< to see what version of the tools you’d need.
You can get the tools package by mounting the VMware Tools ISO to any virtual machine in your vSphere environment, browsing the virtual CD-ROM, and copying all the files to your desktop. If you don’t have an environment available, you can also >>download the installer<< straight from VMware (requires a My VMware account).
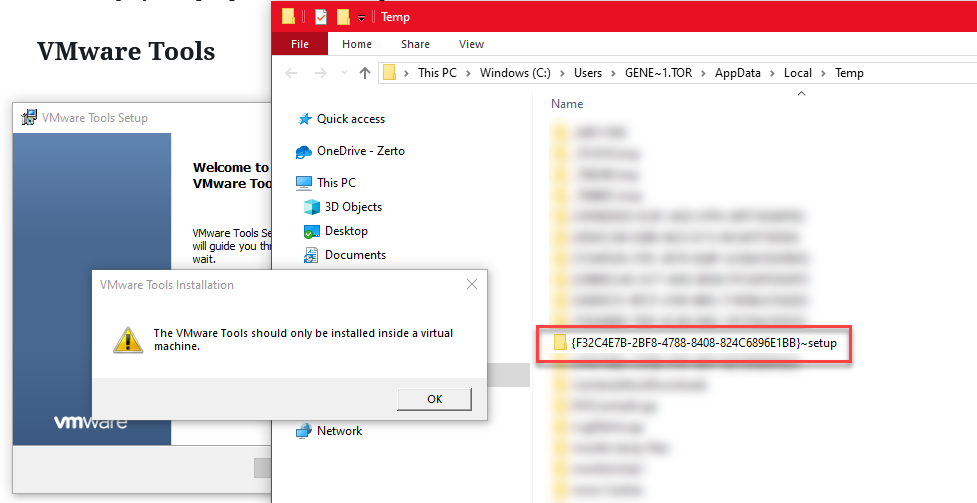
Since you only need a few files from the installer package, start the installer on your desktop and wait for the welcome screen to load. Once that screen loads, if you’re on a physical machine (laptop, PC, etc…), you’re going to get a pop-up stating that you can only install VMware Tools inside a virtual machine. DO NOT dismiss this pop-up just yet.
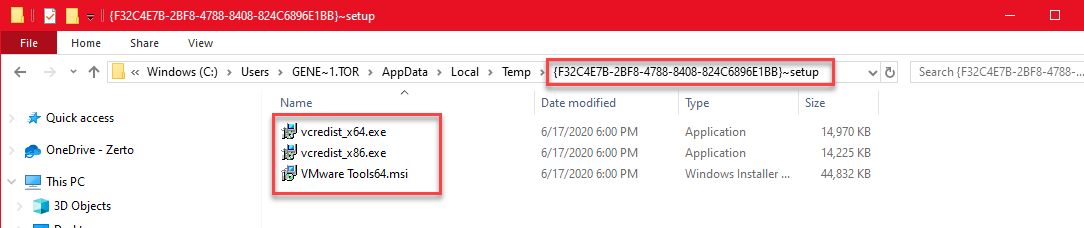
Go to Start > Run and type in %TEMP% , the press Enter.
Look for a folder that follows this naming convention {VVVVVVVV-WWWW-XXXX-YYYY-ZZZZZZZZZZZZZ} followed by “-setup” appended to it and open it.
Copy the following 3 files to a folder on your desktop: vcredist_x64.exe, vcredist_x86.exe, and VMware Tools64.msi
Once you’ve saved the files somewhere else, you can now dismiss the popup and exit the VMware Tools installer.
Microsoft Orca
Microsoft Orca is a database table editor that can be used for creating and editing Windows installer packages. We’re going to be using it to update the VMware Tools MSI file we just extracted in the previous steps, to allow it to be installed within a Hyper-V virtual machine.
Orca is part of the Windows SDK that can be downloaded from Microsoft (https://bit.ly/3d7aWoZ). Download the installer, and not the ISO (it’s easier to get exactly what you want this way).
Run the installer and when you get to the screen where you’ll need to Select the features you want to install, select only MSI tools and complete the installation.
After installation is completed, you can search your start menu for “orca” or browse to where it was installed to and launch Orca.
Edit VMware Tools MSI with Orca
Now that we’ve got the necessary files we need, and Orca installed, we’re going to need to edit the VMware Tools MSI to remove an installer pre-check that prevents installation on any other platform than vSphere.
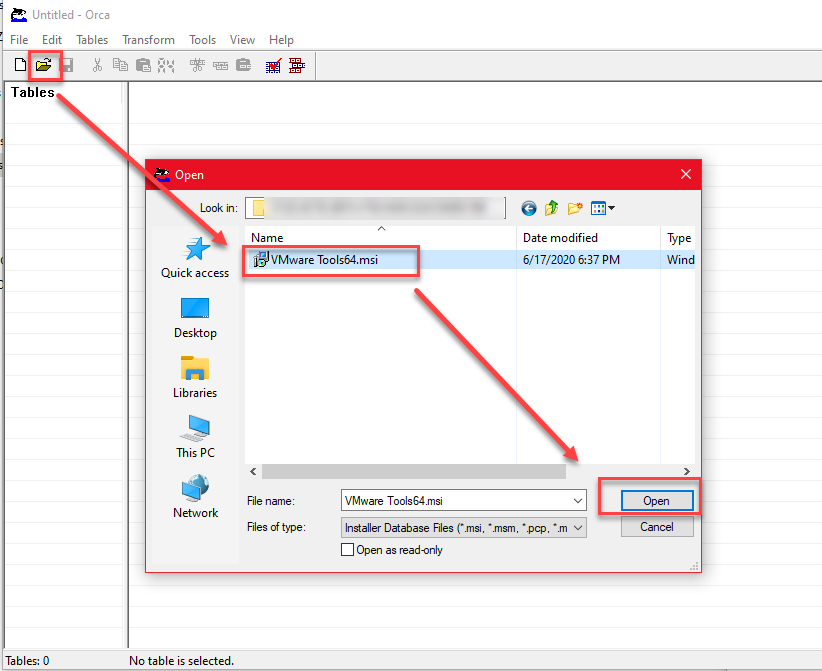
Launch Orca
Click Open, and browse to where you saved VMware Tools64.msi, select it, and click Open.
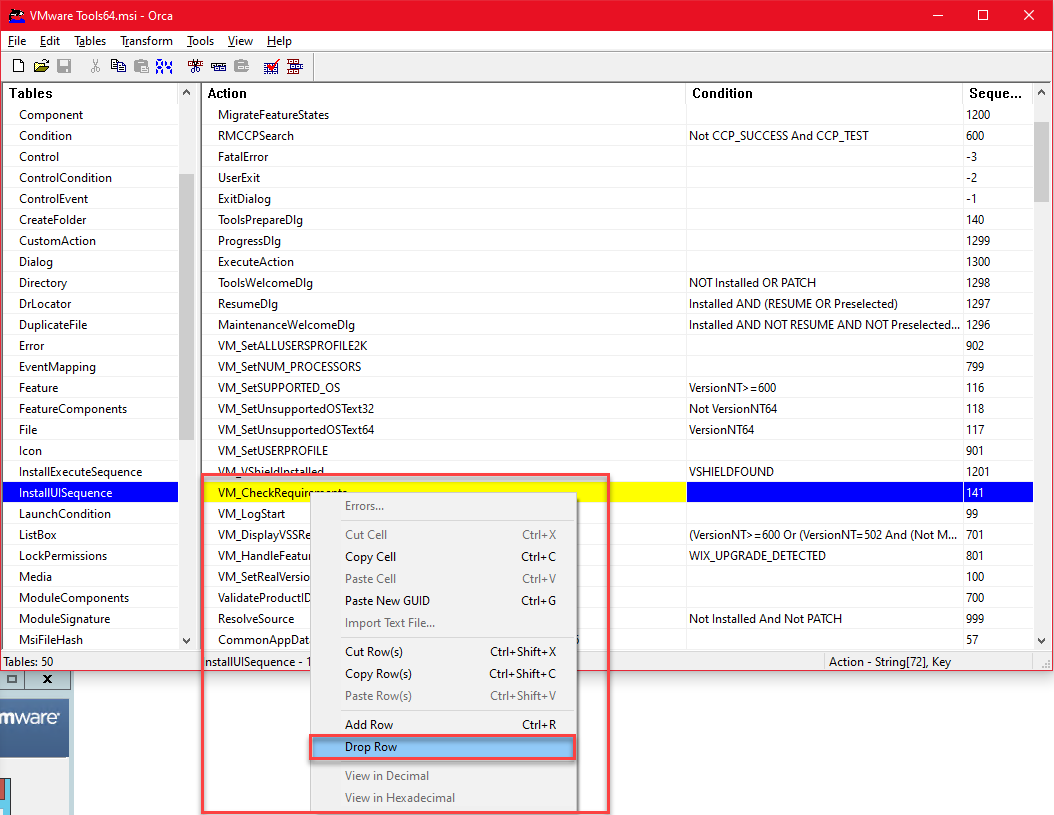
In the left window pane labeled Tables, scroll down and click on InstallUISequence.
In the right window pane, look for the line that says VM_CheckRequirements. Right-click on this entry, and select Drop Row.
VM_CheckRequirements > Drop Row”>
Click save on the toolbar, and close the MSI file. You can also exit Orca now.
What next?
I’ve made you read all the way down to here to tell you that if you want to skip the previous steps and are looking to do this for vSphere 6.7, I have a copy of the MSI that is ready for installation on a Hyper-V virtual machine. If you need it, send me a message on Twitter: @eugenejtorres
Now that you’ve got an unrestricted copy of the VMware Tools MSI package. Copy the VMware Tools MSI along with the vc_redist(x86/x64) installers to your target Hyper-V VMs (or a network share they can all reach), and start installing.
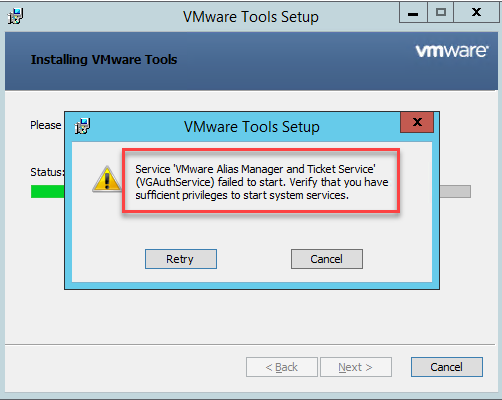
Important: When installing VMware Tools on the Hyper-V virtual machine, you may get the following error:
If you receive the error above, it means you’re missing Microsoft Visual C++ 2017 Redistributable (x64) on that VM.
If this is the case, click cancel and exit the VMware Tools installer. Run the vcredist_x64.exe installer that you copied earlier, and then retry the VMware Tools Installer.
Demo
Since you’ve gotten this far, the next step is to test to validate the procedure. Take a look at the video below to see what migration via Zerto looks like after you’ve taken the steps above.
If you have any questions or found this helpful, please comment. If you know someone that needs to see this, please share and socialize! Thanks for reading!
By now, it’s no secret that the IT Resilience Platform that Zerto has come to be known as offers complete flexibility when it comes to multi-cloud agility. This agility allows businesses to accelerate their digital transformation and truly take advantage of what the public cloud platform offers – ensuring even more freedom to choose your cloud and to be able to replicate workloads to, from, and even between public clouds. As there have been great improvements in Zerto’s any-to-any story, one in particular I’d like to focus on in this article is AWS (Amazon Web Services).
Starting with Zerto Virtual Replication 6.0, customers now have:
Orchestration allowing not only targeting AWS for DR or for workload migration, but now the ability to come back out of AWS to on-premises datacenters, or even the ability to replicate between public cloud providers (AWS, Microsoft Azure, IBM Public Cloud) and Cloud Service Providers (CSPs).
Zerto Analytics visibility between all sites, including public cloud, now with network statistics and 30-day history.
Now, while these improvements are exciting and offer even more cloud agility to customers, one can’t help but realize that before you can actually start taking advantage of ZVR 6.0 to achieve a hybrid cloud architecture or DR in the cloud (specifically AWS), there are some pre-requisites to complete before doing so. That said, meeting those requirements may not seem as intuitive as you’d hope at first glance.
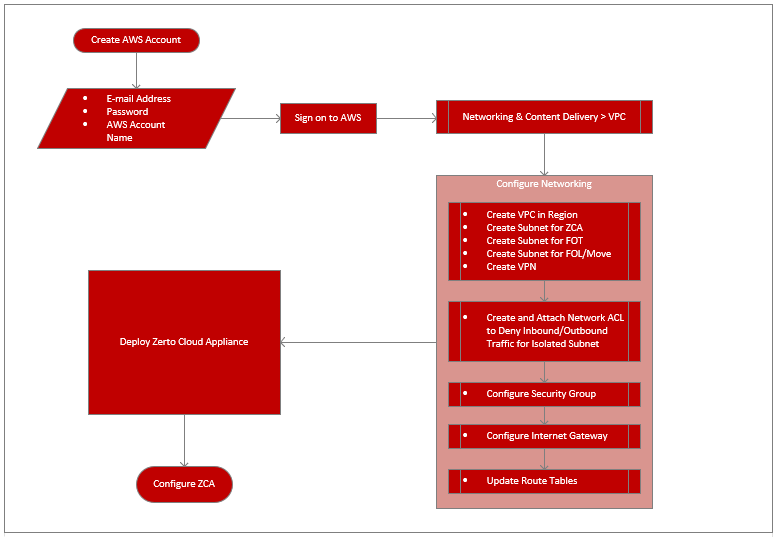
While having a cloud use-case is usually the first step, and is determined by business requirements – the challenge lies within understanding what exactly needs to be configured in AWS for ZVR functionality, and how to accomplish it. If you take a look below, the workflow itself is a multi-step process that may not be very easy to perform, until now.
Figure 1: Configuring AWS for ZVR – Workflow
In my usual fashion of wanting to know exactly how things are done and then sharing it with everyone else, I’ve written a how-to document for configuring AWS for Zerto Virtual Replication, which I am happy to say has been turned into an official Zerto whitepaper and is now available for download!


 VM_CheckRequirements > Drop Row”>