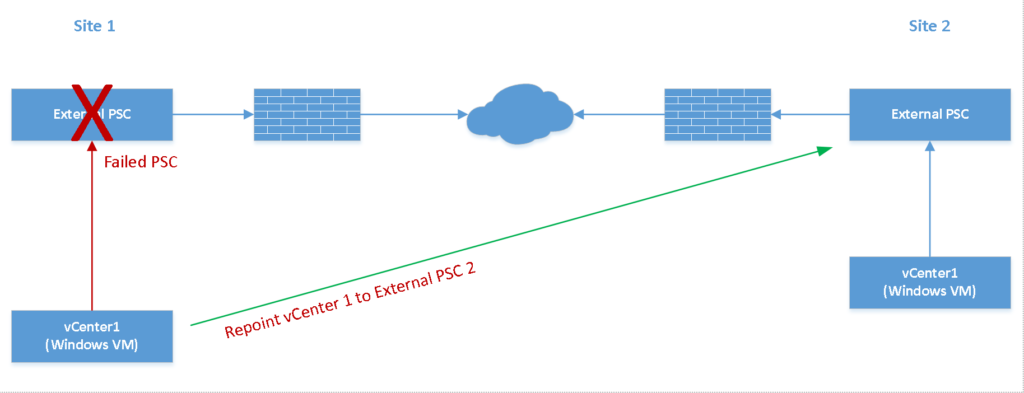
If you’ve followed along starting with the 2-part series about “Deploying Windows vCenter with External PSCs in Enhanced Linked Mode…”, this is the next installment, in which we will go through replacing a failed external PSC using that same topology.
If you haven’t followed along, then the following links will help set the stage for what we’re doing here:
- I have never performed this procedure before.
- I would like to know how to do this and be able to help others out by sharing my experience and the information.
- I would like to understand the requirements and general order of operations for performing the procedure.
- I would like to address a current production issue without experimenting in production, and therefore causing further complications or a causing a complete loss of manageability of my environment.
The Workflow
Lab Testing
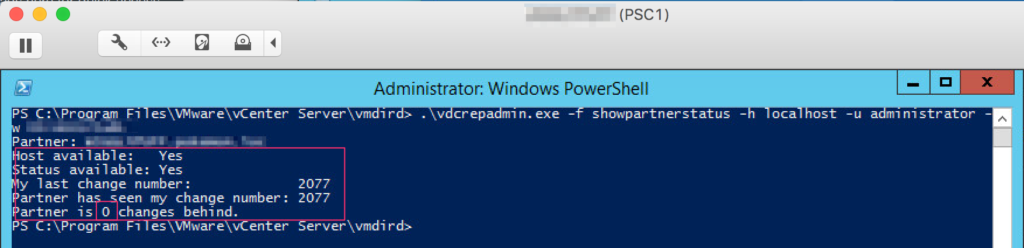
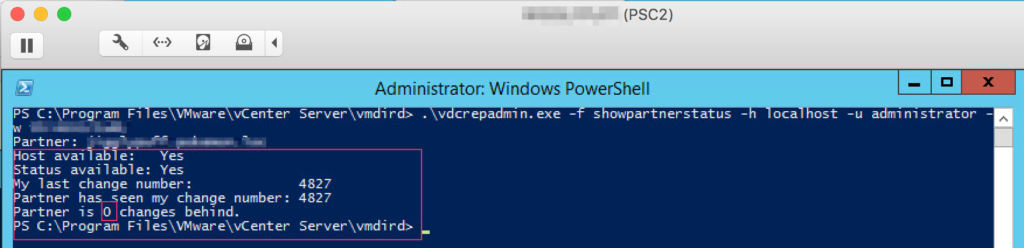
So to prepare for this in the lab, I’ve created a datacenter in each vCenter, assigned some permissions to both of them (AD-integrated permissions), and licensed both vCenters (licenses to be removed following the testing). This was done to ensure that replication was succeeding between the two PSCs. I also ran the vdcrepadmin.exe utility on both PSCs to ensure replication is succeeding, and there are no outstanding changes or replication problems.
From PSC1:
.\vdcrepadmin.exe -f showpartnerstatus -h localhost -u administrator -w [password]
.\vdcrepadmin.exe -f showpartnerstatus -h localhost -u administrator -w [password]
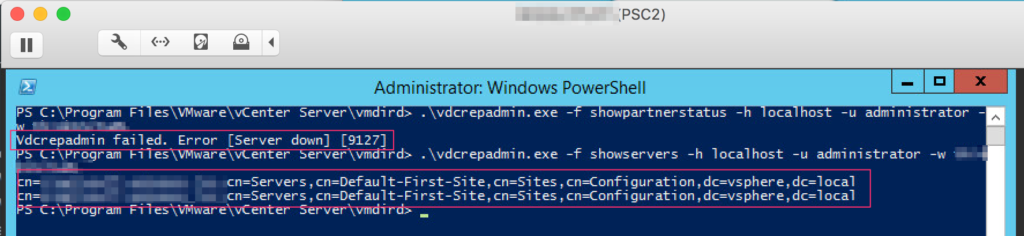
If I run the following on PSC2, it will show that PSC1 is now offline:
.\vdcrepadmin -f showpartnerstatus -h localhost -u administrator -w [password]
If I run the following on PSC2, it still shows that there are two PSCs registered:
.\vdcrepadmin -f showservers -h localhost -u administrator -w [password]
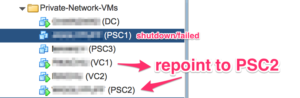
Re-point the Connections Between vCenter Server and Platform Services Controller
- Log onto the vCenter Server instance (VC that is still connected to the failed PSC).
- In the command prompt (run as administrator), navigate to C:\Program Files\VMware\vCenter Server\bin (or wherever you have vCenter installed to).
- Run the cmsso-util script to repoint the connection of this vCenter to the PSC that is still alive:
cmsso-util repoint --repoint-psc psc_fqdn_or_static_ip
(Running the command above may take some time to complete. In my test lab, it took approximately 13 minutes to complete)
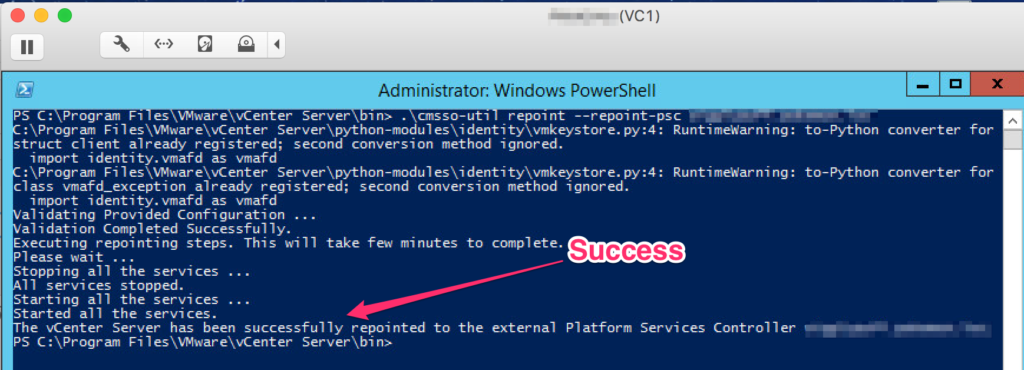
Part of the repointing task includes stopping and starting all vCenter related services on the server. Give the web server additional time to fully initialize before moving on with the next step.
- Log into the vCenter Server instance by using the vSphere Web Client to verify that the vCenter server is running and can be managed.After the web server completed its initialization for VC1, I was able to log in successfully, and verify the inventory, permissions, and licensing. The next step is to Unregister the bad PSC (PSC1) from the configuration on PSC2.
Unregister the Failed PSC
- On the PSC (live one that you just repointed to), open a command prompt (run as administrator).
- Browse to C:\ProgramData\VMware\vCenterServer\cfg\install-defaults.
- On the failed PSC: Open the vmdir.ldu-guid file to find the hostid.
- On the working PSC: Navigate to C:\Program Files\VMware\vCenter Server\bin
- On the working PSC: Run the cmsso-util unregister command to unregister the stopped/failed Platform Services Controller:
cmsso-util unregister --hostId host_Id --node-pnid Platform_Services_Controller_System_Name --username administrator@vsphere.local --passwd [password]
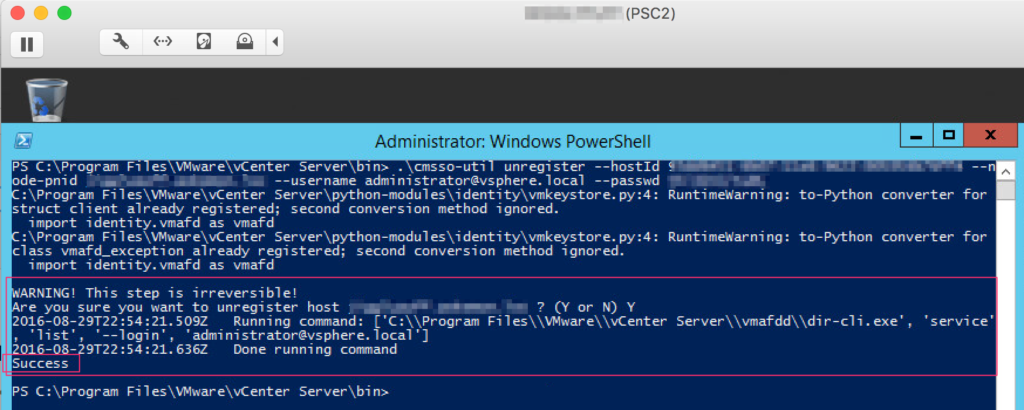
After this has been run successfully, verify that the OLD PSC has been removed from the topology.
- n the vSphere Web Client, navigate to Home > Administration > Deployment > System Configuration. Under the Nodes object, verify that there are only 3 nodes (you should see 1 PSC, and 2 vCenter servers).
- On PSC2, run
.\vdcrepadmin -f showservers -h localhost -u administrator -w ************
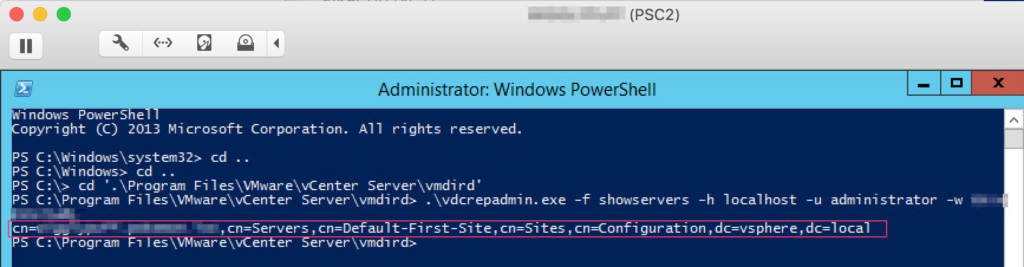
You should now only see one server in the listing, as opposed to 2, since you just removed the failed PSC.
- Delete the failed PSC (VM) you no longer need from the vSphere inventory.
There you have it. We have successfully re-pointed a vCenter to another PSC, unregistered the bad PSC, and validated that we are now ready to rebuild in order to re-instate the original topology. The next part to this series will cover building the replacement PSC, joining the SSO domain, and finally, repointing the vCenter at this new PSC, therefore returning the topology to where it was before we started.